fxos on an intel nuc (the very first steps)
2016-02-08 23:24
My goal is to build a Firefox OS TV set-top box based on an Intel NUC or an Intel Compute Stick. As a first proof of concept I started to scramble something like a real boot to gecko together. I started to look how the connection between gecko and gonk looks like. Especially, the basic display/window code. But, I'm way to new in those areas of gecko and luckily I found a shortcut to start with.
KISS (keep it simple stupid), for now
So let's take a step back. I remembered that b2g is a normal application
target when you build mozilla-central (--enable-application=b2g). So we
can just build it based on GTK3 instead of gonk. Sure, a lot of
functionality will be missing but let's see. And as mentioned in the title,
this is only a first step.
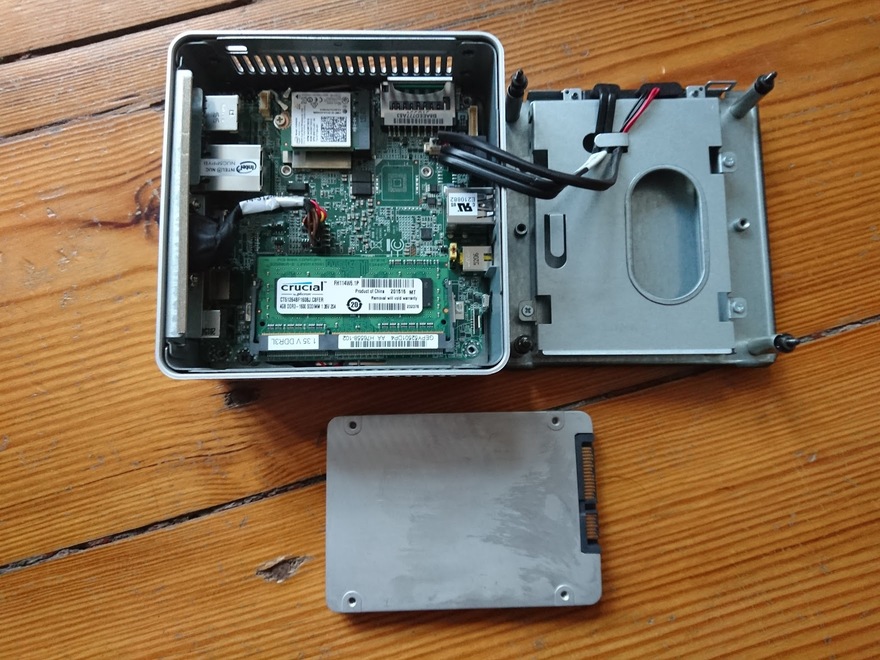
NUC
Hardware: Intel NUC NUC5PPYH
Base specs:
-
Intel Pentium processor N3700
-
4GB DDR3L RAM
-
Intel HD Graphics
-
Intel SSD 320 Series 40GB
The Plan
Super simple:
-
install a minimal Linux (Arch is my weapon of choice)
-
build b2g (build mozilla-central with
--enable-application=b2g) -
build
with (GAIA_DEVICE_TYPE=tv)
-
boot directly in to b2g running gaia in full screen
-
see what it looks like
Let's do this
setting up an arch installation
Even after countless installations of arch I still prefer to use their beginner's guide. Don't get scared, this is totally doable. Just don't try to be a smart ass and start skipping steps :).
Some tips on this would be:
-
use
GPTas partitioning scheme (it's 2016) -
from some reason I needed to boot the installation usb drive in legacy (BIOS) mode (you can still use the UEFI boot loader)
-
a usb stick with
190 MB/s will change your life
- I did a simply partition layout:
512MB EFI, 4GB swap, 30GB /some swap comes in handy, since we're gonna build mozilla-central on this thing!
Go ahead an do this, come back when you reach the Post-installation step.
finishing the base system
First get the network back up. In case you're on wifi:
wifi-menu -o
save it with a nice name like my-super-profile and make it connect
automatically:
netctl enable my-super-profile`
Now set up an user:
useradd -m -G wheel -s /bin/bash fxos
passwd fxos
set a nice password
visudo
uncomment
%wheel ALL=(ALL) ALL
Now you can ether change to the fxos user:
su fxos

cd ~/
or enable ssh and login remotely:
pacman -S ssh

systemctl enable sshd

systemctl start sshd
then you can ssh in your NUC by:
ssh fxos@<IP>
from your machine (checkout MobaXterm if you're on Windows)
prepare for gecko
Get the dependencies to get the dependencies:
sudo pacman -Syu

sudo pacman -S wget python2 git gconf
Get the dependencies (thanks for supporting arch here):
wget -O bootstrap.py
https://hg.mozilla.org/mozilla-central/raw-file/default/python/mozboot/bin/bootstrap.py
&& python2 bootstrap.py
You may be prompted with some questions along the way. In general if it's just
:: Proceed with installation? [Y/n]
go ahead an say Yay \o/. For the more complex questions, this what I
recommend:
Please choose the version of Firefox you want to build:

1. Firefox for Desktop

2. Firefox for Android

Your choice:

1
:: There are 25 members in group base-devel:

:: Repository core
1) autoconf  2) automake  3) binutils  4) bison  5) fakeroot  6) file
7) findutils  8) flex  9) gawk  10) gcc  11) gettext  12) grep  13) groff
14) gzip  15) libtool  16) m4  17) make  18) pacman  19) patch
20) pkg-config  21) sed  22) sudo  23) texinfo  24) util-linux  25) which

Enter a selection (default=all): all
WARNING! This script requires to install packages from the AUR This is
potentially unsecure so I recommend that you carefully read each package
description and check the sources.These packages will be built in
/tmp/tmpEClkJO.

Do you want to continue? (yes/no) [no]yes
:: There are 4 providers available for libgl:

:: Repository extra
1) mesa-libgl  2) nvidia-304xx-libgl  3) nvidia-340xx-libgl  4) nvidia-libgl

Enter a number (default=1): 1
Enter a number (default=1): 1

:: There are 2 providers available for libx264.so=148-64:

:: Repository extra
1) libx264  2) libx264-10bit

Enter a number (default=1): 1
So much for preparation.
building gecko
First of all we clone the git repo (feel free to use mozilla-central or a source snapshot if you know what you're doing):
git clone https://git.mozilla.org/integration/gecko-dev.git
Step inside:
cd gecko-dev
Substitute editor with your favorite or least hated editor like vi or
nano and create a config file named .mozconfig:
editor .mozconfig
Now paste the following configuration:
. "$topsrcdir/b2g/config/mozconfigs/common"


mk_add_options MOZ_MAKE_FLAGS="-j4 -s"


ac_add_options --enable-application=b2g

ac_add_options --disable-libjpeg-turbo
We're all set here. Start the build with:
./mach build
and get a coffee or a beer, this may take a while.
building gaia
Let's get gaia:
cd ~/

git clone https://github.com/mozilla-b2g/gaia

cd gaia
And again a config file:
editor build/config/custom-settings.json
fill with this content:
{
"lockscreen.enabled": false,
"lockscreen.locked": false,
"devtools.debugger.remote-enabled": true
}
Now build gaia:
make NOFTU=1 GAIA_DEVICE_TYPE=tv USE_LOCAL_XULRUNNER_SDK=1
XULRUNNER_DIRECTORY=/home/fxos/gecko-dev/obj-x86_64-unknown-linux-gnu/dist
REMOTE_DEBUGGER=1
That's it with compiling stuff.
some runtime stuff
Let's install some things to prepare out final step. Some of them might not be needed anymore. I'll remove them, once I confirmed that. But for now do:
sudo pacman -S nodejs npm xorg-server xorg-utils xf86-video-intel xorg-xinit
ttf-dejavu pulseaudio pulseaudio-alsa pavucontrol
You'll be prompted to choose an input driver:
:: There are 2 providers available for xf86-input-driver:

:: Repository extra
1) xf86-input-evdev  2) xf86-input-libinput

Enter a number (default=1): 2
Booting into Gecko!
In order to boot into gecko aka start b2g in full screen we need bring up an
xserver on login. Therefore, edit the ~/bash_profile:
editor ~/.bash_profile
and paste the following to automatically invoke startx on login:
[[ -z $DISPLAY && $XDG_VTNR -eq 1 ]] && exec startx
Also we want fxos to automatically login after boot. Use:
sudo systemctl edit getty@tty1
to modify the tty1 target and paste:
[Service]

ExecStart=

ExecStart=-/usr/bin/agetty --autologin fxos --noclear %I $TERM
The final step is to automatically start b2g in full screen. Edit the
.xinit file:
editor ~/.xinitrc
and paste:
# set hdmi as sound output

pactl set-card-profile 0 output:hdmi-stereo+input:analog-stereo &

# start b2g and debug server

exec /home/fxos/gecko-dev/obj-x86_64-unknown-linux-gnu/dist/bin/b2g
--profile /home/fxos/gaia/profile -screen 1919x1080 -start-debugger-server
6000
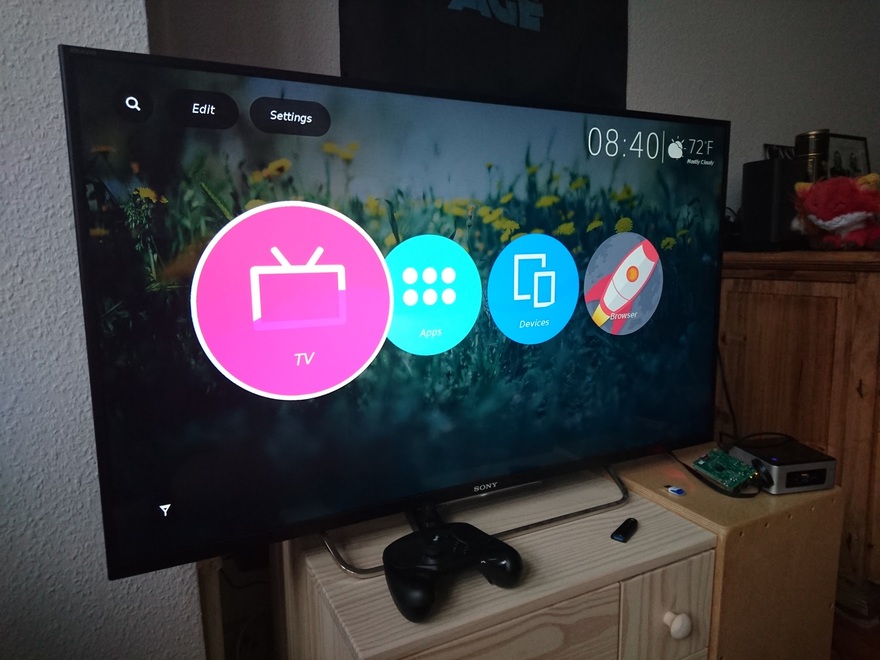
Sadly the 1919x1080 is not a typo. 1921x1080 works also if you want to
see what happens if you use 1920x1080 go ahead and give it a shot :)
Reboot and it should look like this:
Where to go from here (remember, this was just a first step)
There are many problems with this quick and dirty boot to gecko hack. But this give us a lot to work on. Here are some nice next steps, some of them might be just a config change:
-
figure out why the performance is so bad in this setup
-
enable access to wifi, bluetooth, volume, ...
-
fill the settings menu with life
-
enable the real market place
-
make it work with an xbox/steam controller
And the bigger things:
-
remove the need for X => make it work with wayland
-
even remove the need for GTK3
-
get feature parity with gonk based build without depending on Android
-
cross compile it the raspberry pi 2
Known Issues
For some reason remote debugging with WebIDE does not work as I would expect. If I forward the port it works nicely:
ssh -L 6000:localhost:6000 fxos@<IP>
probably just some settings.
I'm still working through all settings in gaia and b2g. There's a log to learn.
*There is much more to write but it's getting late and I'm getting tired. I will keep updating this article and/or write more on this topic. If you have feedback please make a pull request for https://github.com/fiji-flo/mozilla-berlin/blob/master/fxos/nuc.md *